New Roster View and Planning Tool
This article provides an overview of the available functionality from the perspectives of Support Staff viewing the Roster for the shifts they're rostered into and Team Leaders and Rostering teams viewing the Roster for scheduling purposes.
Audience: Authorised Customer Representatives, Team Leaders, Rostering Teams, Support Staff
Summary
The following list summarises the content within this article. Click on the links below to take you to the relevant sections:
- Roster Views, Filters & Icons
- New Roster View - Support Staff
- New Roster View - Team Leaders
- Choose how you want the roster views to be displayed - coloured by Site, Service or Data Type
- Viewing Activities
- Agenda view of Activities
- Agenda view of Shifts
- Viewing Additional Activities or Shifts
- To Be Filled
- Overnight
- Newer Data Available - Click here to Refresh
- Team Leaders - How to add Activities
- Timeline view of shifts by day
Roster Views, Filters & Icons
The New Roster is available for all users in the SupportAbility Web App and is the default view upon accessing the Roster.
The Roster can be viewed from different perspectives and there are several filters for refining the data displayed.
Coloured card borders and icons are also displayed to assist with interpreting the data at a glance.
Navigating between New and Old Roster
If you prefer to use the previous version of the roster, you can select ‘Go to Old Roster’:

SupportAbility will remember this preference and apply it the next time you access the Roster in the Web App. You can toggle between versions as needed to monitor the changes by selecting 'Go to New Roster':

Roster Views
Several different Views of the data are available in the new Roster along with related filters. These are accessible at the top of the screen as shown here:

The different Views include the following:
- Agenda - visible only to staff with the privilege to manage Activities
- Calendar - visible to all staff
- Timeline - visible only to staff with the privilege to manage Activities
These Views can be filtered by several criteria, however, not all filter options are available for each View.
The filters and their options are:
- Data:
- Activity - available in the Agenda and Calendar View
- Shift - available in the Agenda, Calendar and Timeline View
- Period :
- Day - available in the Agenda/Activity, Calendar/Activity, Calendar/Shift, Timeline/Shift Views
- Week - available in the Agenda/Activity, Calendar/Activity, and Calendar/Shift, Views
- Month - available in the Agenda/Activity, Calendar/Activity, and Calendar/Shift, Views
- Colour:
- Data Type: Activities are displayed with a white background, except in the Calendar view where they are green.
Shifts are displayed with a white background, except in the Calendar view where they are blue. - Service - Activities and Shifts relating to the same Service are displayed with the same coloured background
- Site - Activities and Shifts relating to the same Site are displayed with the same coloured background
- Data Type: Activities are displayed with a white background, except in the Calendar view where they are green.
Additional Filters
Additional filters are available on the left of the Roster, such as a Calendar and filters for Staff Member, Site, Service, Program and Client.
Calendar
The calendar in the top left allows you to navigate to different dates and the blue arrows allow you to navigate between the different months:

When viewing your own Roster, a grey dot displays beneath the dates where you have a rostered shift.
The blue arrows on either side of the word 'Today', located top right of the Roster, also allow you to navigate forward and back based on the period selected, i.e., Month, Week, or Day. Selecting 'Today' will return you to the current date:

Staff/Site/Service/Program/Client Filters
Below the Calendar are several filters which can be used to further refine the results, noting the 'Staff Member' filter is not visible to staff who do not have the privilege to manage Activities, as they can only see results for their own Roster:

These filters can also be used in conjunction with the available filters at the top of the screen to refine which data and how it is displayed.
When viewing your own Roster, the filters can be used to display the shifts you are rostered into for particular Sites, Services or by Program (if your organisation is utilising Programs in Activities). You can also filter by the Client/s scheduled into the Activities you have rostered shifts for:

Rostering Staff, Team Leaders and Mangers can view the Roster holistically or refine the data displayed using the relevant filters:

Borders and Icons
Useful icons and coloured borders are displayed in the new roster to indicate Client Absence, Client Conflicts, Staff Clashes, Shift Sign Off, and Activity Sign Off as outlined below.
Coloured Borders
A coloured stripe at the left border of Activities and Shifts indicates the following:
- Green (Data: Activity) - Activity not signed off
- Navy Blue (Data: Shift) - Activity not signed off
- Grey - Activity has been signed off
- Amber - there is something that needs attention, e.g. Availability issue
- Red - there is something that needs attention, e.g. a To Be Filled Shift
Icons
The icons which display in Activities and Shifts indicate the following:
- Airplane (Data: Activity & Shift) - Staff Clash/Availability Issue
- Person X (Data: Activity & Shift) - Client marked as Absent
- Tick (Data: Shift) - Staff Shift Signed Off
- Hammer (Data: Activity) - Activity has been signed off
Shift View

Activity View

Hover for more information
You can hover over any of the shift cards to see more information, such as the Site and Service of the Activity and the participating Clients:

To open the Activity the shift belongs to in a new tab, select the Activity Name link in the shift card, e.g., Wednesday Social Group - Bowling, noting that the Roster remains open in the previous tab. This method replaces the original version's 'Return to Roster' feature.
When 'Week' or 'Day' is selected as the Period, more information is displayed in the shift cards. A blue line indicating the current time across the week/day e.g. 1.43PM is also displayed:

In the Week or Day period layout, the length of the shift determines how much information is displayed on the shift card. More information is available when hovering over this in cases of a really short shift, e.g. 10 minutes:

New Roster View - Support Staff
The new Roster displays the shifts you have been rostered into, which are shown in a 'Month' period layout by default. However, you can change the period you are viewing the Roster to 'Week' or 'Day' at any time, depending on your preference.

The calendar in the top left allows you to navigate to different dates, and a grey dot is displayed against any of the dates where you have a rostered shift.
Shifts for the current month are loaded upon opening the Roster. The arrows on either side of the word 'Today' allow you to navigate forward and back based on the period selected, i.e. Month, Week or Day. Selecting 'Today' will navigate you back to the current date.
Choose how you want your Shifts to be displayed - coloured by Site, Service or Data Type
You can choose how you want your Shifts to be displayed, i.e. coloured by either by Site, Service or Data Type, to help you quickly and easily identify where each Shift is scheduled, creating a clearer, more intuitive view of your roster.
To change this, select the 'Colour' drop-down:

'Data Type' is the default option, which means that the roster cards are coloured by 'data type', i.e., Shifts (blue).
If you work across different Services and would prefer that each of the Shifts that you are rostered in to are displayed differently by Service, you can choose for the roster cards to be coloured by Service here:

Alternatively, if you work across different Sites and you prefer that each of the Shifts that you are rostered in to are displayed differently by Site, you can choose for the roster cards to be coloured by Site instead.
New Roster View - Team Leaders
If you have the Team Leader privilege for a specific Site and Service, or all Sites and Services, your options will differ from those outlined above.
The new Roster displays the shifts you have been rostered into, by having your name selected in the 'Staff Members' filter by default, displayed in a 'Month' period layout:

Once you have updated your filters based on the data in the roster you wish to view, SupportAbility will remember this and display these by default following this.
Choose how you want the roster cards to be displayed - coloured by Site, Service or Data Type
From the upgrade to SupportAbility v9.5 (Nov, 2025), you can now choose how you want the roster views to be displayed, i.e. coloured by either Site, Service or Data Type, to help you quickly and easily identify where each Shift or Activity is scheduled, creating a clearer, more intuitive view.

SupportAbility assigns the colours automatically from a carefully designed palette of 28 accessible colour sets, ensuring clear contrast, readability, and consistency for all users. The same colour will always appear for the same Site or Service, keeping your roster visually stable and easy to interpret. In addition:
- Colours are automatically assigned in alphabetical order by active Site or Service name.
- Deactivated Sites or Services appear last in the list, ensuring active ones keep their colours.
- Everyone sees the same colour for the same Site or Service, providing a consistent experience across all users.
- Once all 28 colours are used, the palette repeats from the beginning.
- Adding, deactivating or reactivating Sites or Services won’t change existing colours.
When switching between Site and Service, you may notice some colours appear the same. This is expected; both use the same 28-colour palette, but colours are applied independently within each list.
Viewing Activities
To view Activities, select 'Activity' from the Data option, along with the relevant filters:

In the above example, we're reviewing Activities in the Roster for the Day Service and Community Access Service at the Melbourne Site, in the Week layout.
When 'Week' or 'Day' is selected, more information is displayed in the green Activity cards, along with a blue line indicating the current time across the week/day.
Activity cards in the new Roster are currently displayed in green (Shifts are currently blue). We are reviewing options in future releases to give Team Leaders the choice of how they wish to view this data, e.g. different colours for Site/Service and for other priorities, based on what is important to you.
To open an Activity, select the Activity Name link in the card, e.g., Music Appreciation, noting that the Roster remains open in the previous tab. This method replaces the original version's 'Return to Roster' feature.
You can hover over any of the green Activity cards to see more information, such as the Site and Service of the Activity and the rostered Staff and participating Clients:

Agenda view of Activities
From the upgrade to SupportAbility v9.5 (Nov, 2025), an ‘Agenda’ view of Activities is now available in the new Roster for Team Leaders:

This is similar to the 'List' view in the old roster and can be useful when reviewing a large number of Activities, such as across multiple Sites or Services.
When Colour is set to 'Data Type', each row in the Agenda view appears in white:

If Site or Service is selected as the Colour option, each of the rows in this view will be coloured accordingly, e.g. Colour = Service:

Each row also has a coloured stripe at its left border, as can be seen above, which indicates the following:
- Green - Activity not signed off
- Grey - Activity has been signed off
- Amber - there is something that needs attention, e.g. Availability issue
- Red - there is something that needs attention, e.g. a To Be Filled Shift
To navigate to an Activity, click on the name. Noting that in addition to all of the regular Activity details, the Activity Location is also displayed in this view, and you can also select 'View Staff Notes', to view any Replicating or Non-Replicating Staff Notes that have been added to the Activity:

Activities can be created in the Agenda view by selecting the 'Add Activity' button:
 Once selected, the Activity creation wizard opens up, allowing you to add a New Activity as required:

Agenda view of Shifts
From SupportAbility v9.12 (June, 2026), the Agenda view is no longer limited to Activities. When 'Shift' is selected as the Data option, the Agenda view now lists Shifts as well.
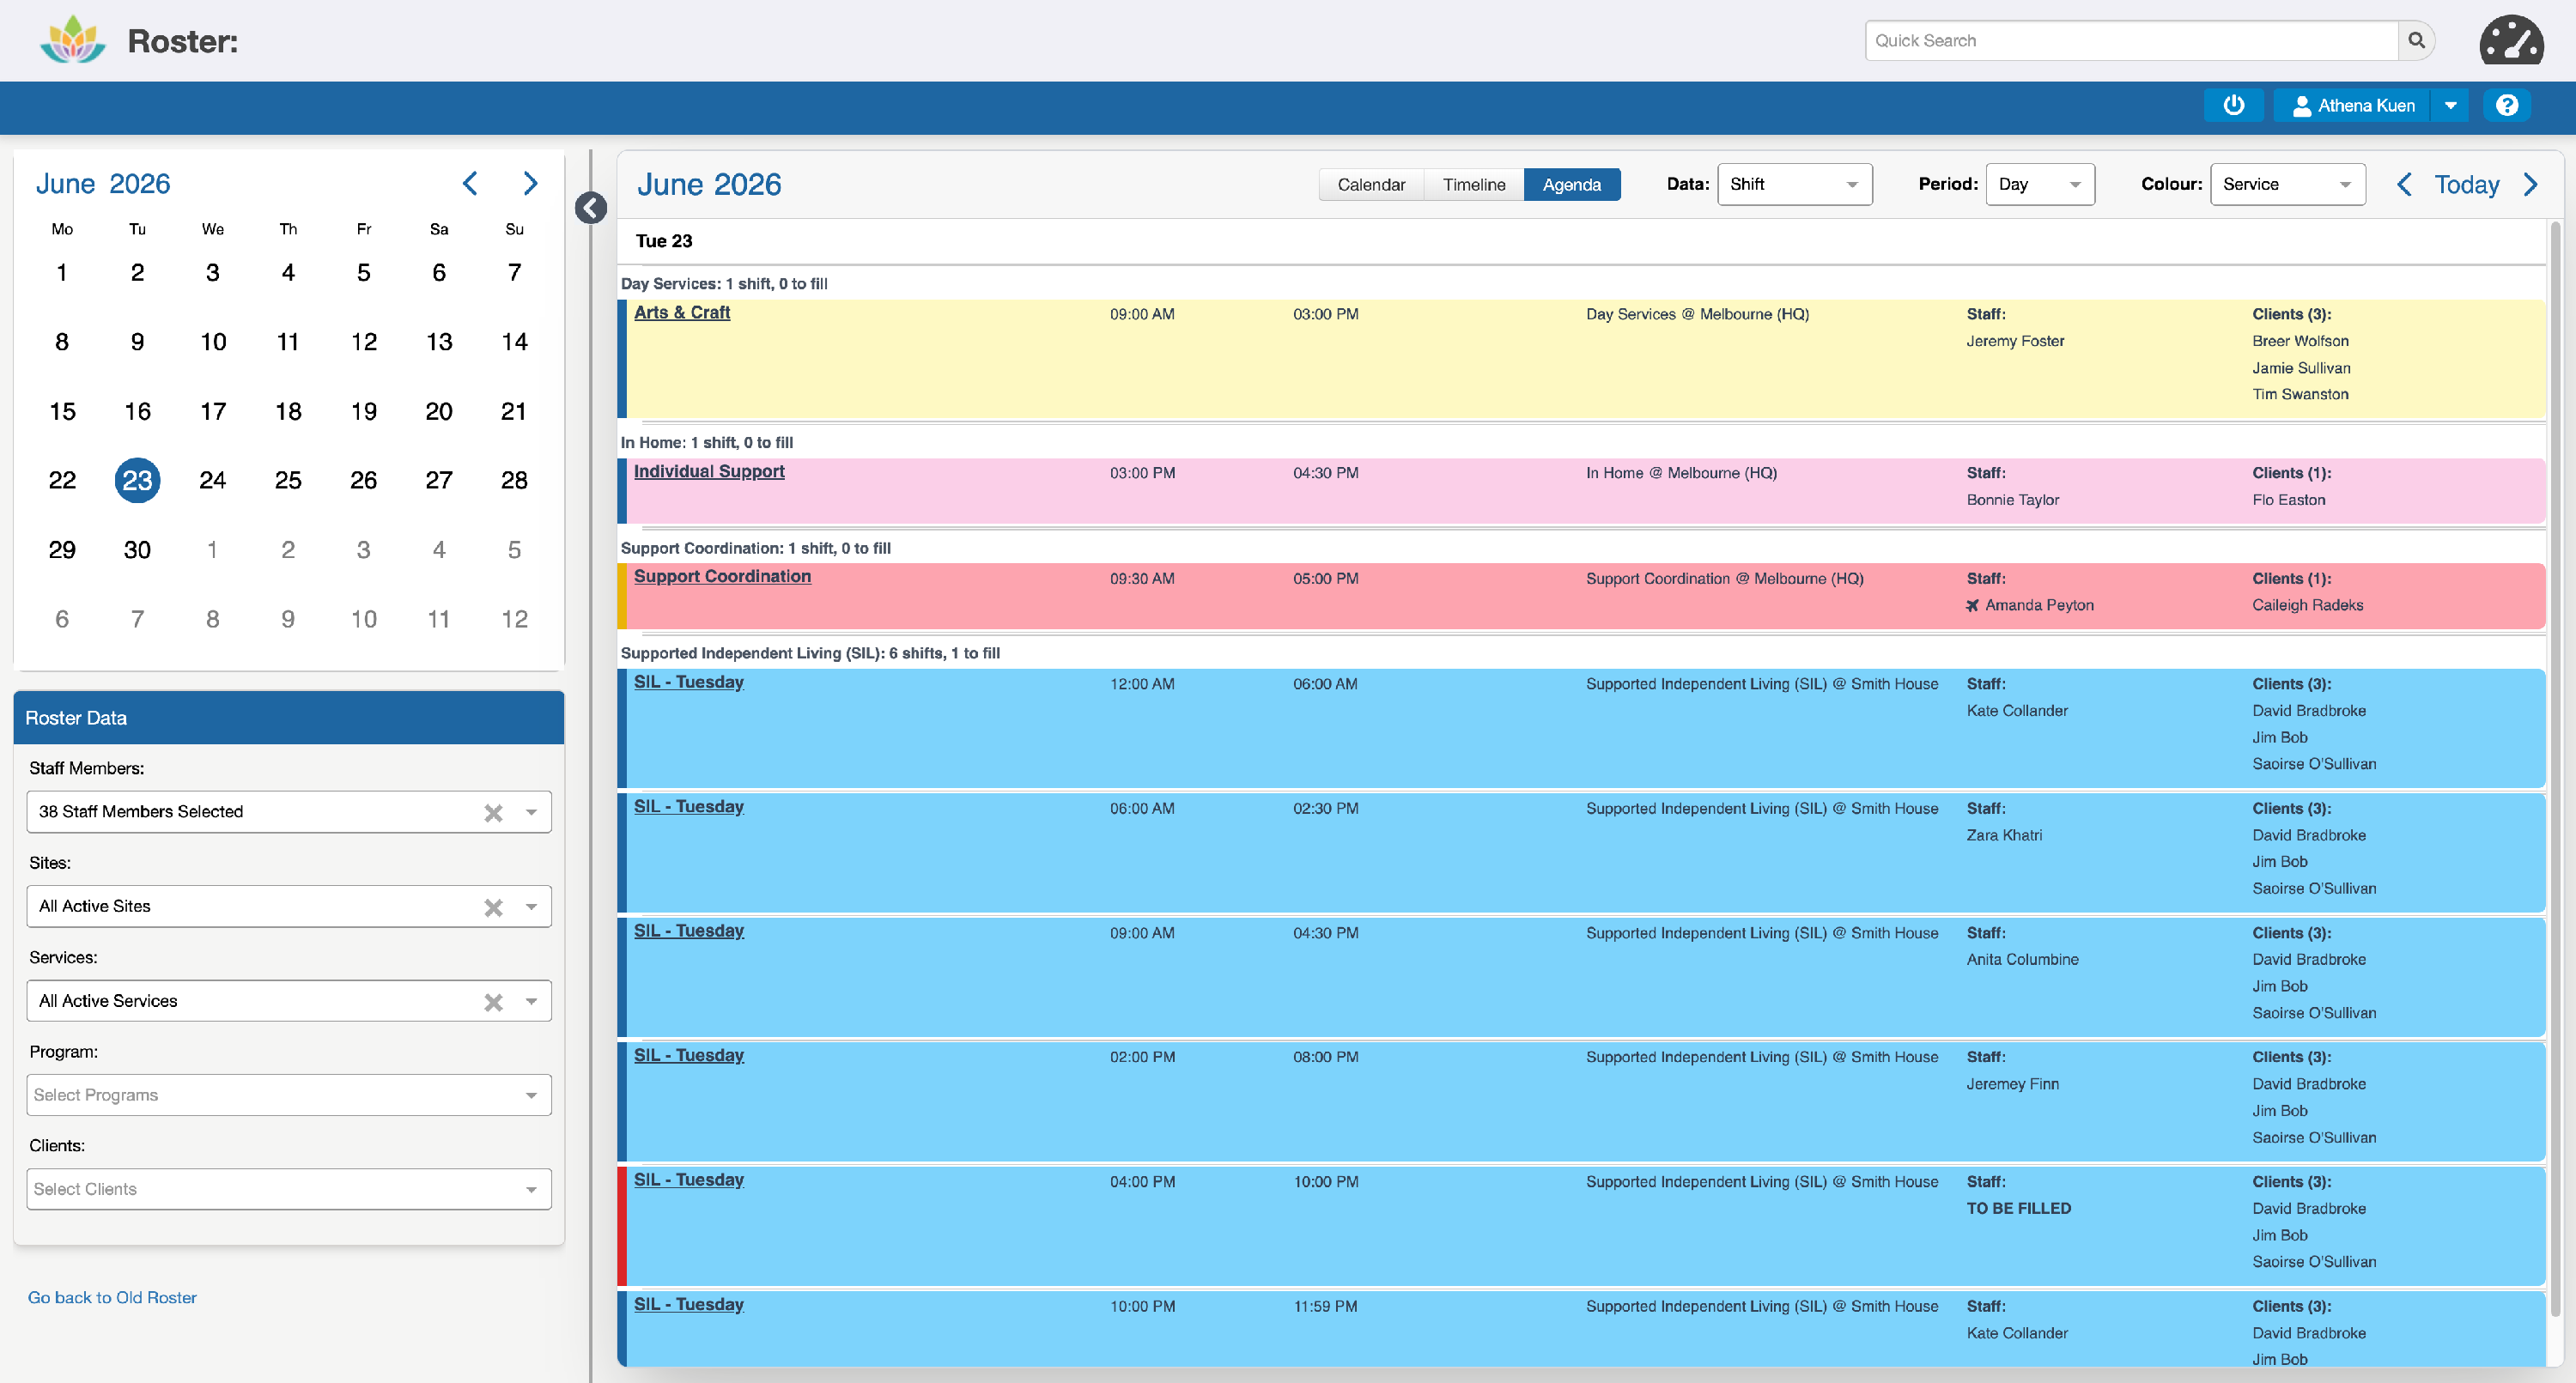
Previously, the Agenda view showed which Activities were happening, but to see which Shifts within those Activities still needed someone, you had to switch to the Timeline view.
For teams who prefer working from the Agenda view, particularly when working through 'To Be Filled' Shifts, Shift-level detail is now available without changing views.
Activities and Shifts grouped by Service or Site
From SupportAbility v9.12 (June, 2026), Activities and Shifts in the Agenda view are now grouped by Service or Site, based on your active 'Filter roster by' selection, rather than being listed alphabetically by Activity name alone.
This brings the Agenda view closer to the nested, grouped layout of the old roster's List view. Related Activities and Shifts now sit together under a clear group heading, with a secondary alphabetical sort by Activity name applied within each group. This grouping is applied consistently across the Day, Week, Month, and custom date range views.
Viewing Additional Activities or Shifts
When there are additional Activities or Shifts to view that cannot be displayed on screen, e.g. Tuesday the 20th of May, the total number of Activities or Shifts is displayed in a grey bar:

Select this to see more details:

Or, switch to the Day view:

To Be Filled
When an Activity includes To Be Filled shifts, these are displayed in both data views with a red stripe on the left-hand side of the card.
Example of this in the Activity view:

Example of this in the Shift view:

Overnight
When Shifts/Activities occur overnight, these are displayed in the 'Overnight' row at the top of the Roster:
 Hovering over the card provides more information about the Shift/Activity.
Newer Data Available - Click here to Refresh
When a change is detected, a refresh indicator appears, prompting you to refresh the data by clicking on it:

Utilising this new feature loads the updated data much more efficiently than a browser refresh and has the added benefit of keeping you on the selected date.
Team Leaders - How to add Activities
SupportAbility v9.2 (July 2025) introduces the ability for Staff with Team Leader privileges to create Activities in the New Roster.
A video providing an overview of the changes and new functionality is available to view by clicking the following link:
Activities can be added from the 'Activity' view. When adding an Activity from this view, your filters pre-populate key details such as Site, Service, Staff Member/s and/or Client/s, designed to save you time.
For example, suppose we create an Activity for the Community Participation Service at the Melbourne Site. This Site and Service are pre-populated in the 'Add a New Activity' set-up wizard when selected in the filters.
If we'd selected any Staff Members, a Program or Clients in the filters, these details would also pre-populate. However, it is important to note that these details will only prepopulate if one item is selected in the filters.
To add an Activity, you can either single-click on the relevant date and time for a one-hour Activity, e.g. 10 am on Friday the 25th:

It is worth noting that if you clicked on 10:30 am, this will populate 10 am - 11 am, as it rounds to the hour.
Alternatively, you can click and drag to select the required duration, e.g. 10:30am - 11:30am.
Here is an example of this in the Week Period view:

Or the Month Period view (useful for 24-hour or multi-day Activities):

Once selected, the 'Add a New Activity' set-up wizard opens, allowing you to create an Activity:

Following the Activity Details being added, the next step is to add the relevant Client/s as needed:

Followed by adding the relevant Staff, or 'To Be Filled' Shifts.
If you don't know who will be rostered into this Activity as yet, or if there are multiple Staff Shifts that are required, the number of needed 'To Be Filled' Shifts can be added here:

If the Shift times differ from the Activity time, they can be edited in the Activity record once created.
If you know the Staff Member you wish to add, they can be selected here, or you can search by Name or Employment Type:

When the Pay Period has been configured for your organisation, the Staff Member’s total ‘Agreed Hours’ and ‘Potential Overtime’ risk for their Agreed Period, i.e. Week or Fortnight, inclusive of the Activity Duration, is displayed.
This will mostly be useful if you are creating an Activity and the Staff Shift times align with this, and you are looking for the best match.
However, if you are creating an Activity with multiple Shifts with times that differ from the Activity time, e.g. camps or SIL, this information is more useful in relation to Staff Shifts, which are edited from within the Activity record. Please see the How to fill ‘To Be Filled’ Shifts and change a Staff Member in a Shift article linked below for reference.
From SupportAbility v9.10 (April 2026), Agreed Hours are also visible directly in the Timeline view of the Roster — see Agreed Hours below.
It is important to note that data will only be displayed in these new columns once the Pay Period has been configured. Please see the Configuring the Pay Period for your organisation article linked below for more information.
Once the required 'To Be Filled' Shifts have been added and/or the relevant Staff Member/s have been selected, select 'Next: Confirm':

After reviewing the summary and ensuring everything is correct, select 'Add Activity' and you will be able to navigate to this as needed by selecting the link, or you can 'Create Another' as needed, or select Close to navigate back to the roster:

Timeline view of shifts by day
Select the link below to watch a video overview of the new Timeline view:
This new view, as of SupportAbility v9.3, is designed to assist rostering teams and team leaders in filling 'To Be Filled' shifts and updating shifts on the day when needed, for example, if someone calls in sick.
As of SupportAbility v9.7, Roster cards in the Timeline view are now sorted by modified date, so the most recently updated records appear first.
As of SupportAbility v9.10, Agreed Hours are now visible in the resource row - see Agreed Hours below
Agreed Hours
From SupportAbility v9.10 (April 2026), Team Leaders and rostering teams can now see each Staff Member's Agreed Hours directly in the Timeline view of the Roster.
This provides a real-time snapshot of a Staff Member's total rostered hours within their agreed period — Week or Fortnight, based on your organisation's configured Pay Period — making it easier to identify available capacity and assess potential overtime risk while building or adjusting the roster, without needing to navigate away from the Timeline view.
Agreed Hours are displayed in the Staff row in the format Rostered / Agreed, e.g. 38.5 / 38h, alongside a 'business time' icon:

The icon is colour-coded so the status can be assessed at a glance:
- Green — the Staff Member is within their Agreed Hours for the period
- Red — the Staff Member is at or over their Agreed Hours for the period (potential overtime risk)
Hovering over the icon displays the text 'Agreed Hours' for additional context.
The calculation is based on the day you have navigated to in the Timeline. If you navigate to a date outside the current Pay Period, the figure reflects the rostered hours for that period. Hours from any Shifts that have been marked as 'Not Paid' are excluded.
Reassigning a Shift via drag and drop in the Timeline view (see Drag and drop to allocate 'To Be Filled' shifts, or change Staff Member below) updates the Rostered Hours for both the originating and receiving Staff Member in real time.
Please note: Agreed Hours will only be displayed once your organisation's Pay Period has been configured. The icon will not appear next to Staff Members who do not have Agreed Hours configured.
Please see the Configuring the Pay Period for your organisation article linked below for more information.
Staff Availability
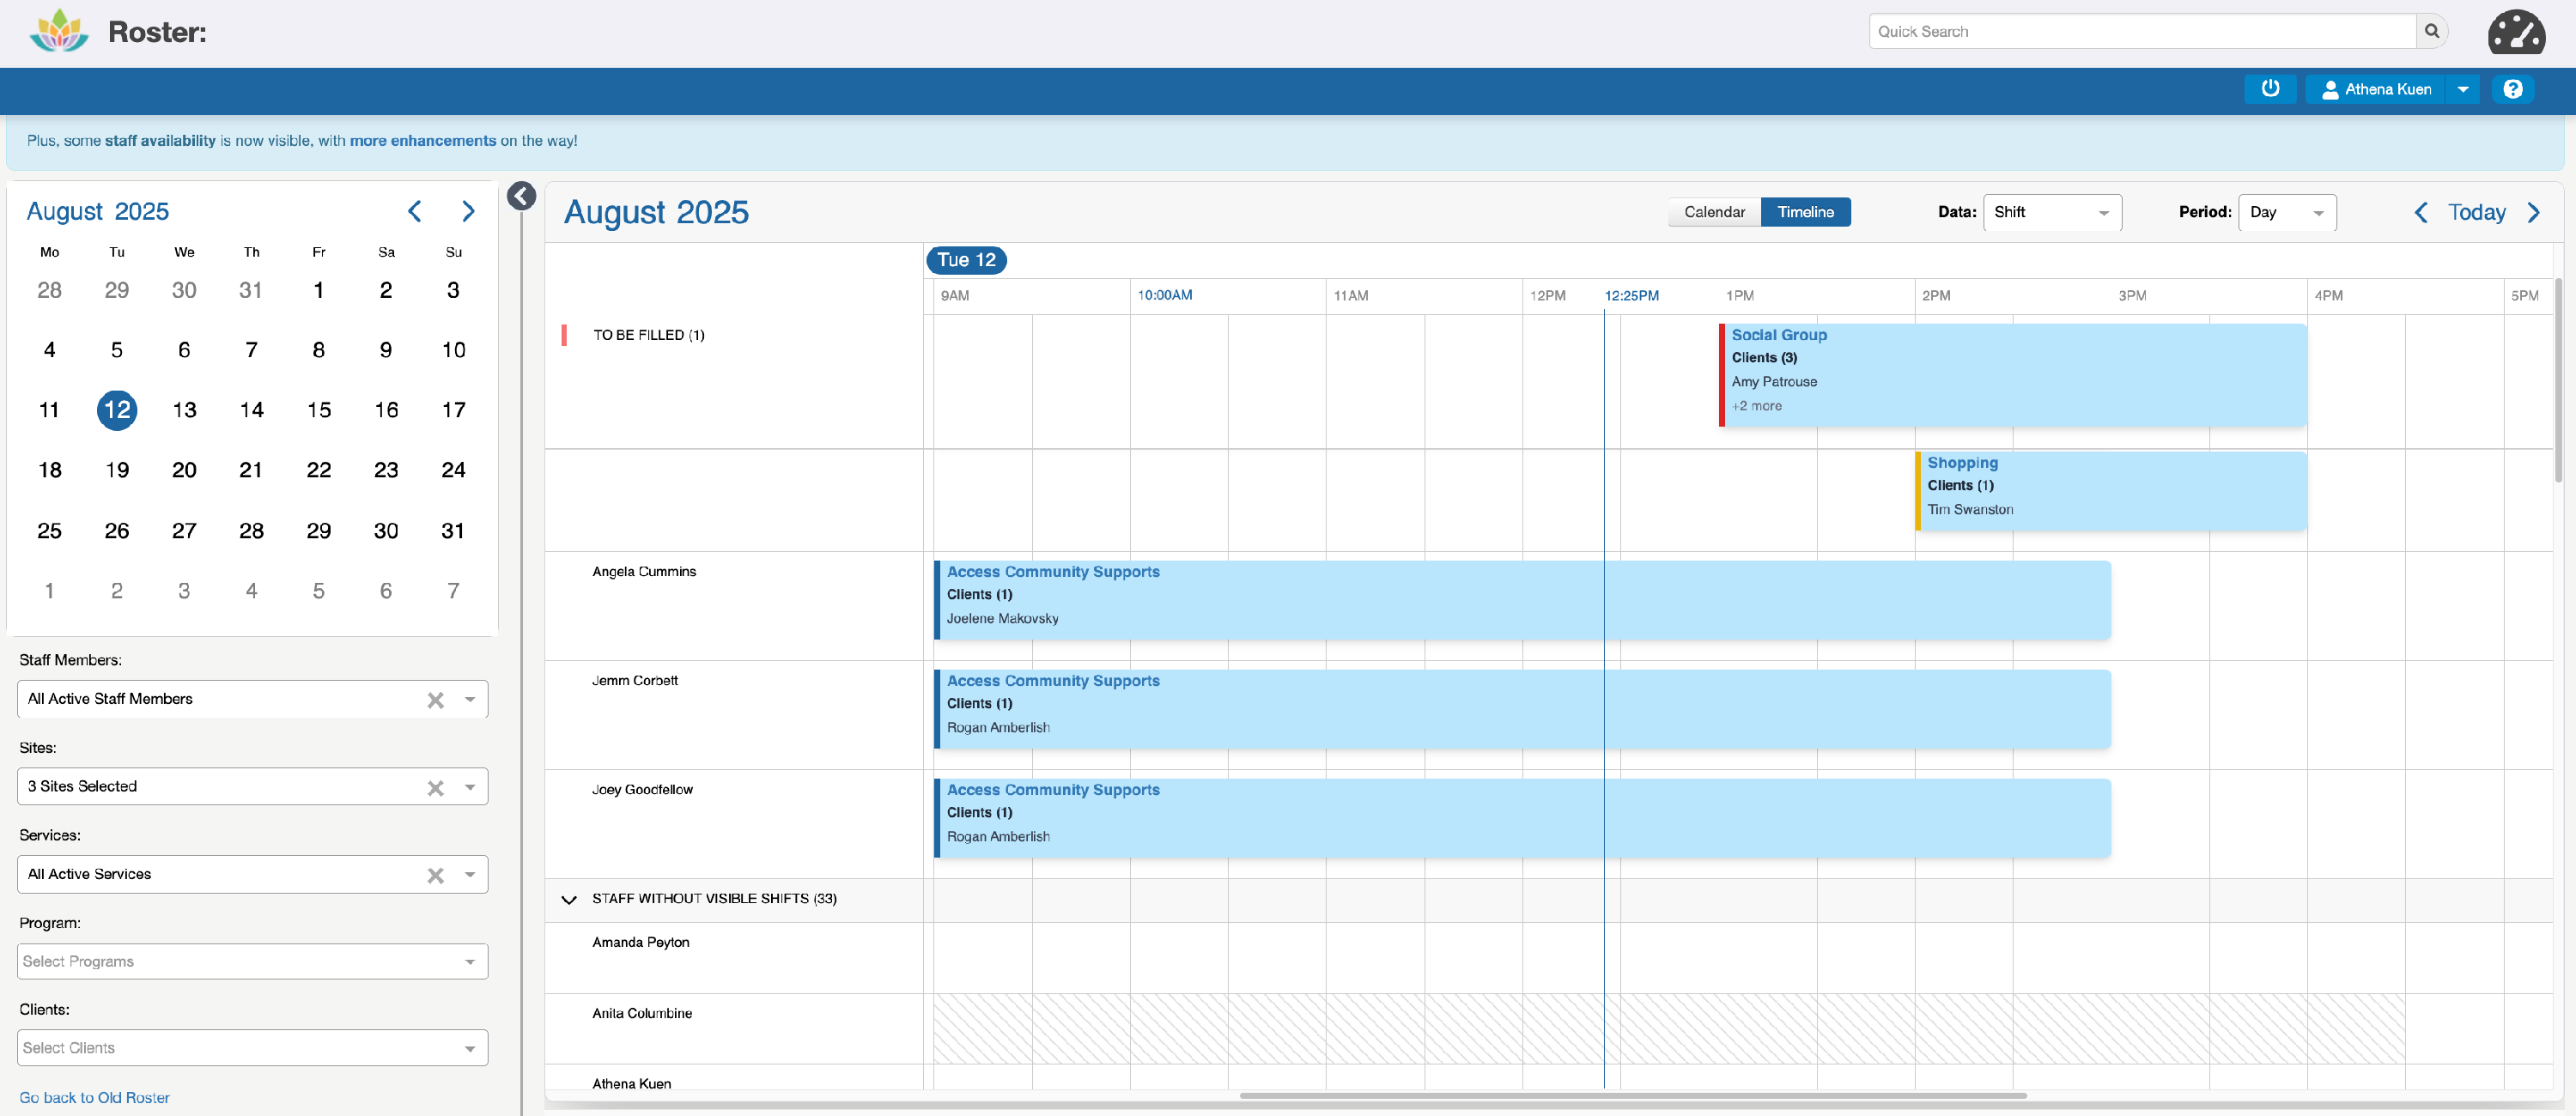
When a Staff Member is not available, from SupportAbility v9.4, they are displayed in grey, or grey with a diagonal stripe in the Timeline view:

When they are displayed in grey, e.g. Abel, Amanda, Angela, Brian or Bridget, this means they're not available at this time due to either their Standard Availability or an Unavailable Leave Exception.
When grey with a diagonal stripe is displayed, e.g. Abel or Angela, this means that they've been rostered into a Shift for a different Site/Service at that time.
When both are displayed, e.g.,Abel, this means both of the above situations are true; they are either usually unavailable as per their Standard Availability, or they have an Unavailable Leave Exception, and they've also been rostered into a shift.
In a future release, a 'Confirm Shift Allocation' modal will be displayed when moving a shift to a Staff Member who is not available to confirm this action.
Filtering the shifts and staff displayed
The filters allow you to change the Shift data displayed for the chosen day, for example, if you only want to view Shifts for specific Sites or Services.
In the case where a Shift exists for a Staff Member in the 'Staff Without Visible Shifts' section, but you cannot see this due to the way the filters are set, the time that they are busy will show them as unavailable with diagonal grey lines, e.g. Anita:

Anita is scheduled into a SIL Shift, but we don't have the SIL house selected as one of the Sites we're viewing in the filters, hence she is showing as unavailable in this way.
Unavailability will soon be extended to display when any of the 'Staff Without Visible Shifts' are:
- rostered into Shifts for any Sites/Services that Team Leaders may not have access to, or
- if they are unavailable based on how their Standard Availability has been configured in the 'Availability' tab of the Staff Account, or
- if they are unavailable due to a leave exception.
In addition to controlling the data displayed in the roster, the 'Staff Member' filter also controls which Staff are listed in this view.
It is important to note that new filters, in addition to the above, are expected in this view in a future release to provide greater control over which ‘Additional Staff’ are displayed. For example, to allow you to limit the 'Additional Staff' displayed to those who work in a particular Site or Service.
Drag and drop to allocate 'To Be Filled' shifts, or change Staff Member
SupportAbility v9.3 introduces the first drag-and-drop functionality in this new view!
To Be Filled shifts can be filled, or you can change a rostered shift from one staff member to another by dragging and dropping the Shift to the relevant Staff Member.
It is important to note that when allocating Shifts using the new roster, the Activity Replication Management settings are not triggered, even if they are enabled. This means that no Staffing changes are made to the remaining Activities in the Set when Shifts are filled or changed.
For example, if we drag the 'To Be Filled' Shift for the 'Social Group':
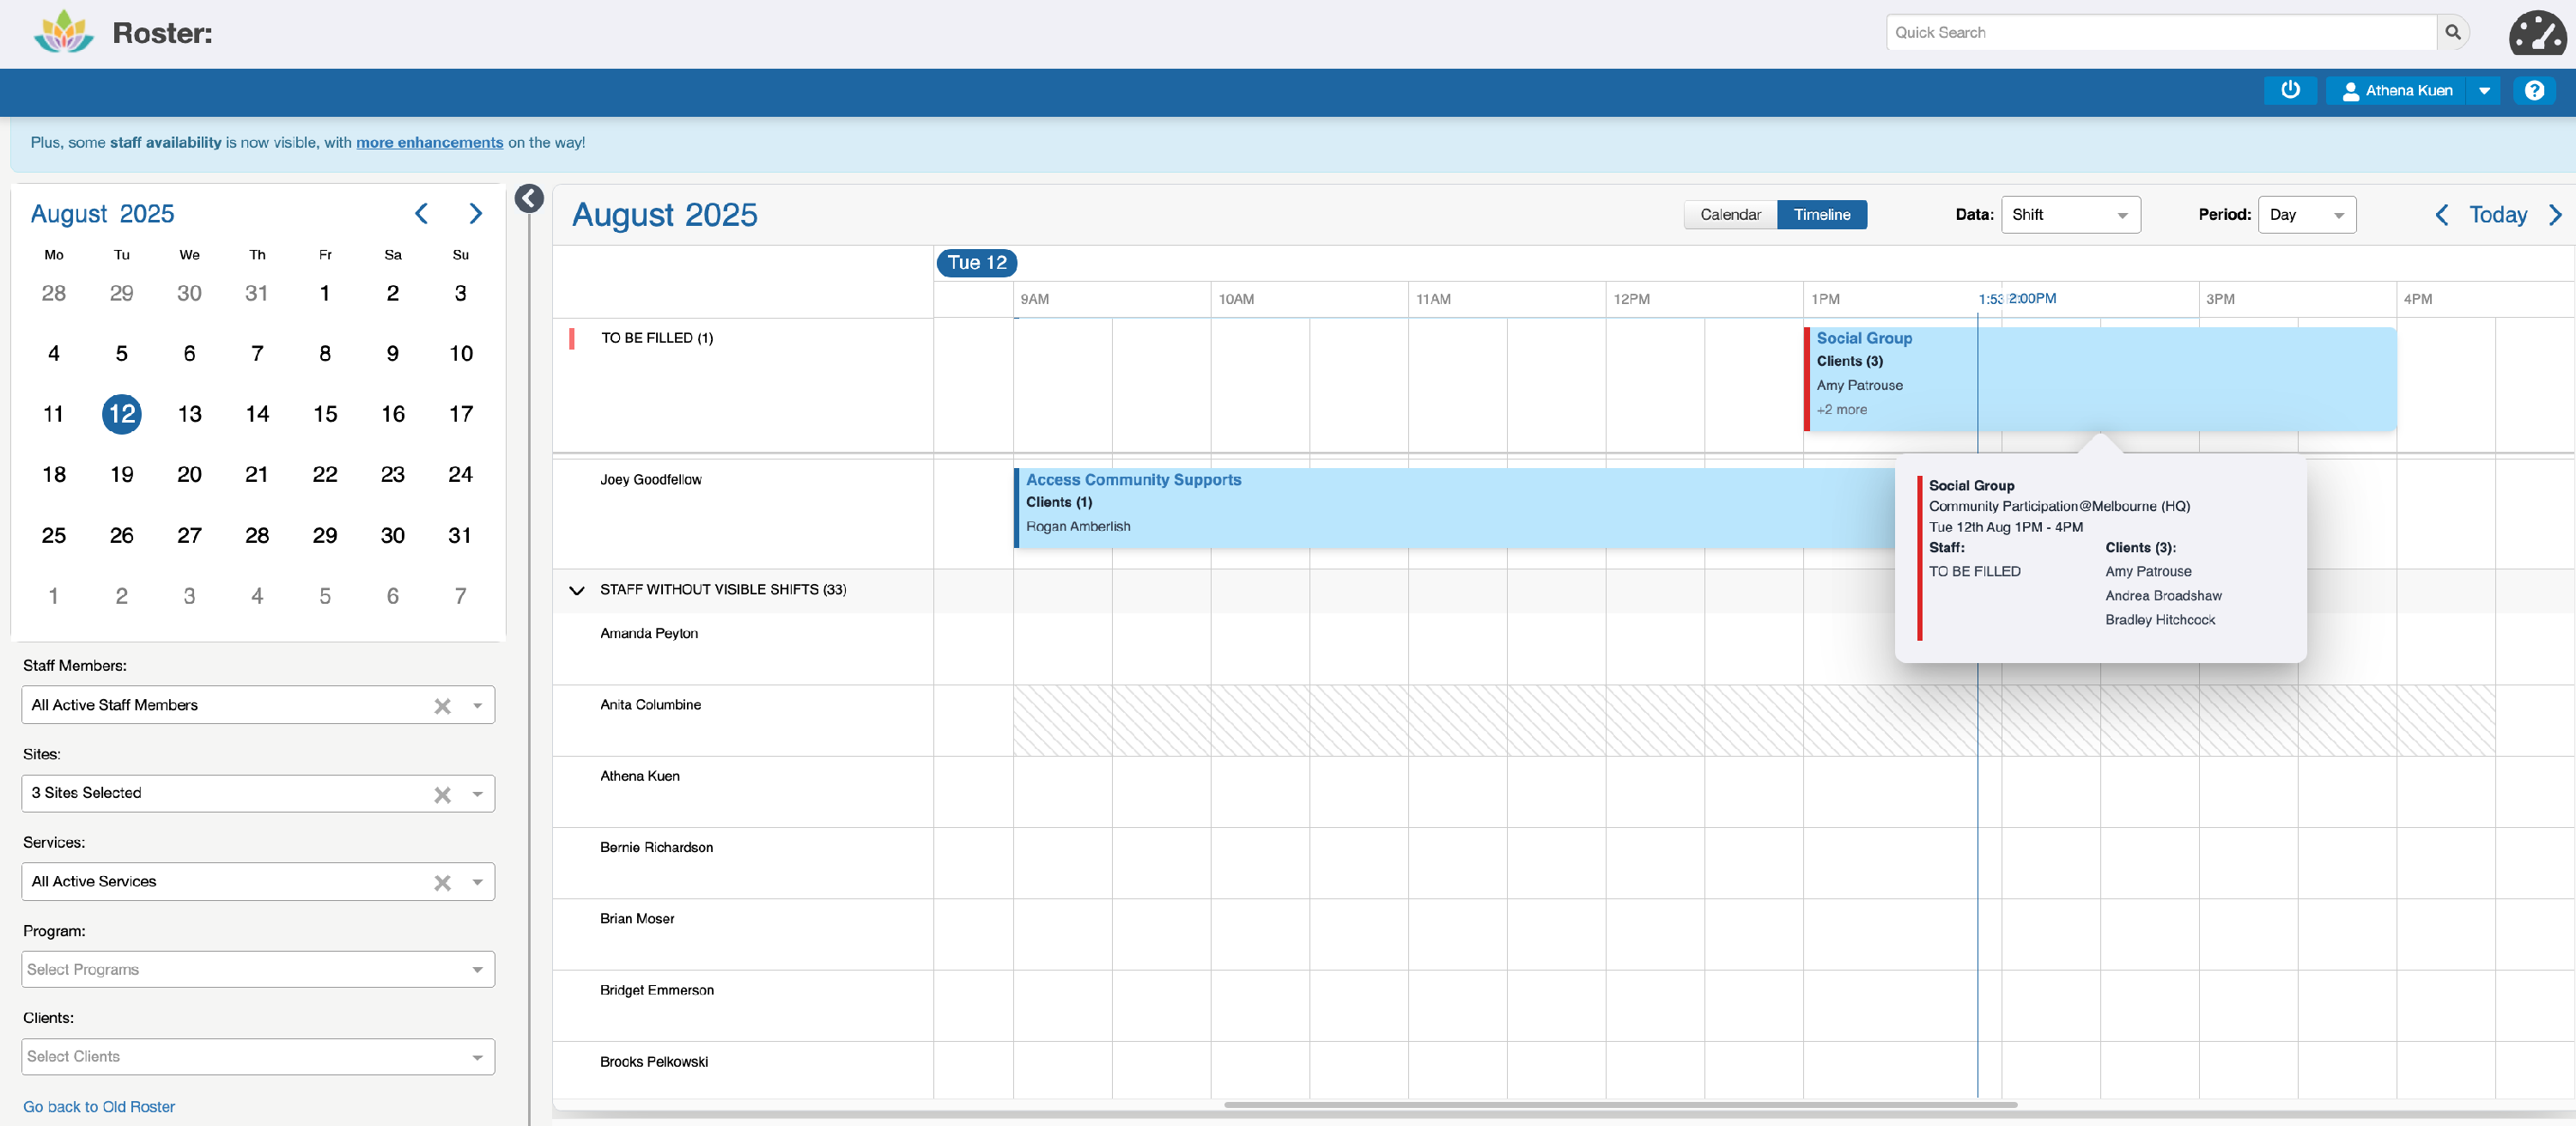
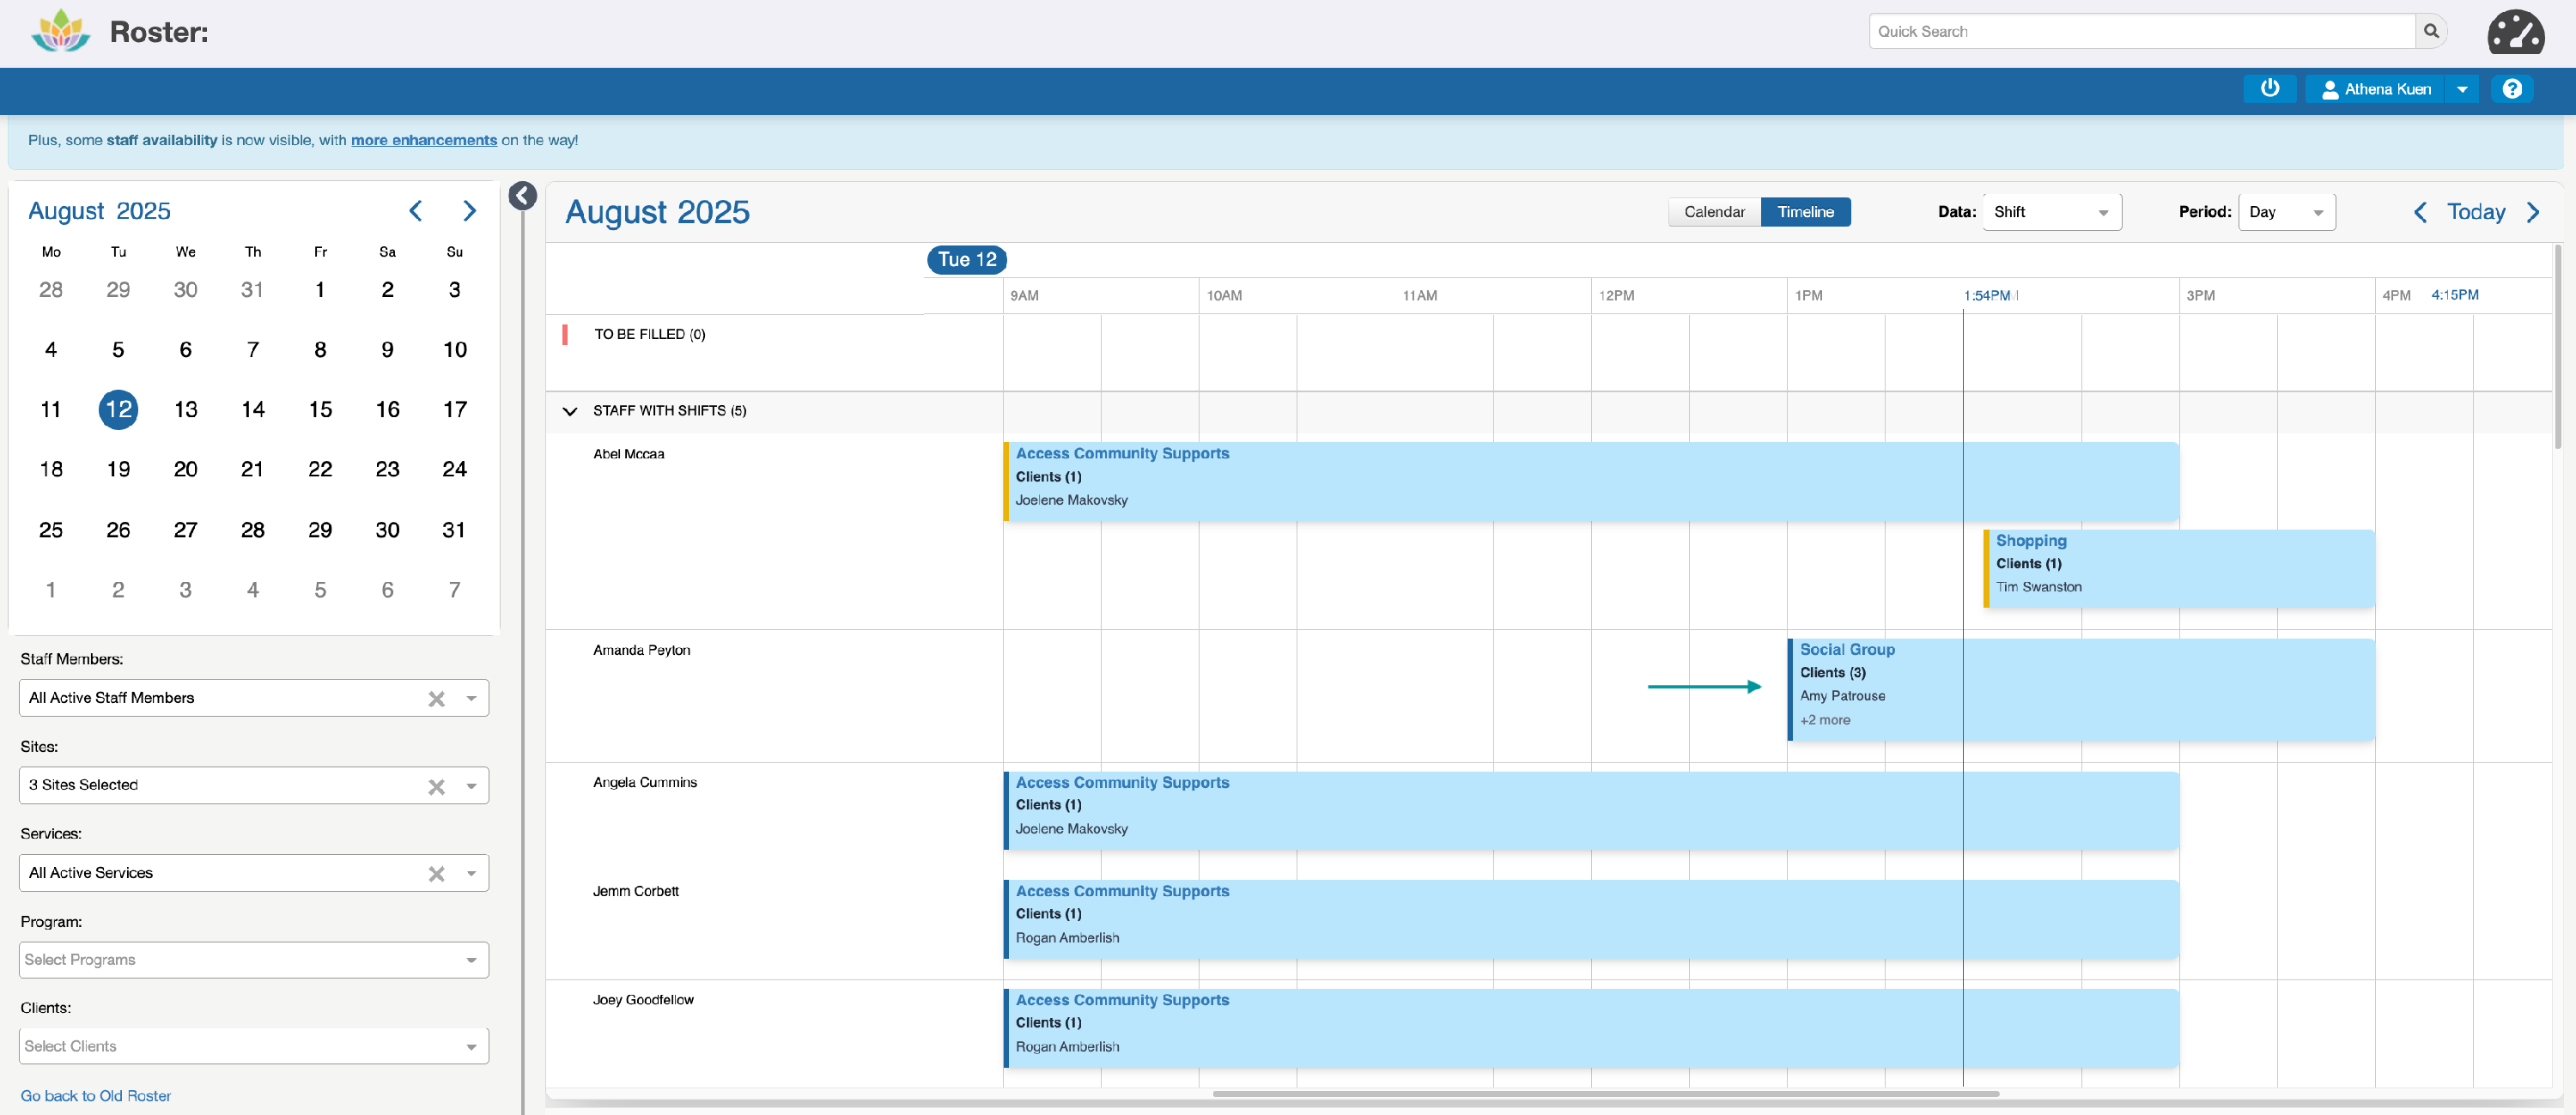
To Staff Member Amanda, this allocates the Shift to Amanda and moves this to display it in the 'Staff With Shifts' section:
You will note that once a shift has been dragged and dropped to a staff member, there is no confirmation to allocate these shifts or undo the selection. This is because confirming every time an intentional change is made would drive rostering teams and team leaders mad.
The only time confirmation of shift allocation is required is when allocating the shift will result in:
- recorded shift data being lost
- the Staff Shift Sign Off being removed
- a Staff Clash, or
- an Availability issue

From SupportAbility v9.12 (June 2026), after allocating a Shift via drag and drop, you are returned to that Staff Member's row in the 'Staff With Shifts' section, with a brief highlight on the newly allocated Shift.
Previously, after a drag-and-drop allocation, you needed to scroll back up the page to see the allocated Shift again, which was time-consuming for providers with large numbers of Staff. This keeps you in context so you can continue working through the roster without losing your place.
Finding the most suitable Staff Member to fill/replace the Shift
The goal is that eventually, greater information will be displayed, similar to the 'Change Staff Member' and the 'Add a new Activity' creation wizards, to assist in finding the best Staff Member to fill or replace the Shift with.
However, for now, the information about the 'best match' is not displayed, and filling or changing the Shift is reliant on you knowing who you are going to change this to. As the list of 'Staff Without Visible Shifts' is dependent on those you have access to, and the number of Staff in your organisation, this list can become very long and not ideal to drag and drop Shifts to without filtering this list down first.
As mentioned above, new filters are expected in this view in a future release to provide greater control over which ‘Additional Staff’ are displayed. For example, these filters will allow you to limit the 'Additional Staff' displayed to those who work in a particular Site or Service. For now, the only way to limit the list of Staff displayed here is to change the 'Staff Members' selected in this filter.
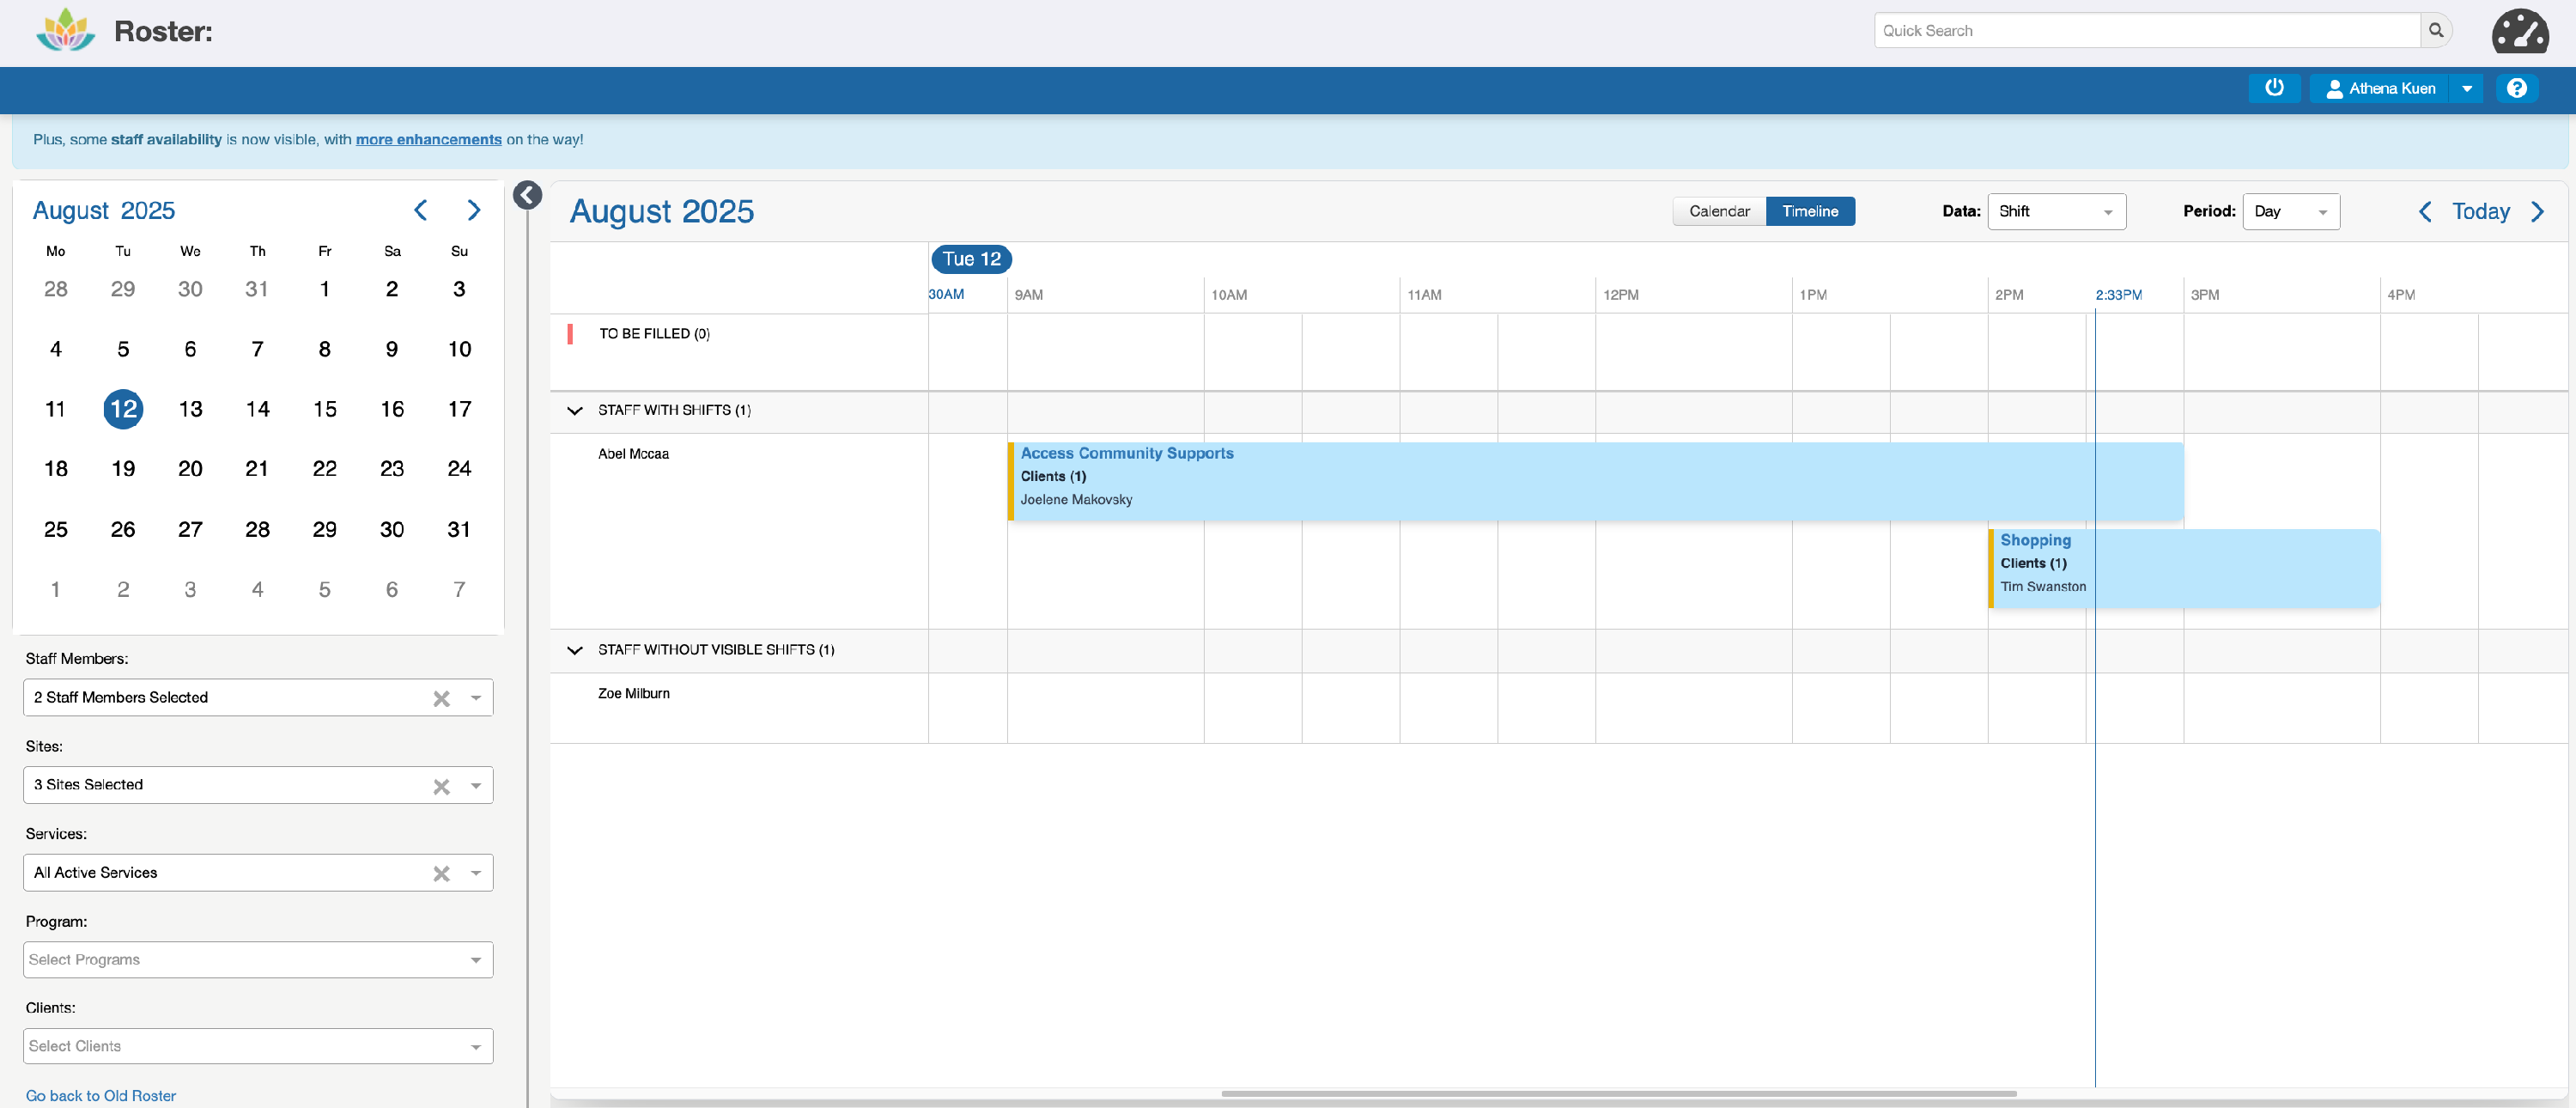
Should we wish to fill or change a Shift to a Staff Member who is not displayed on screen, we could use the 'Staff Members' filter to select either 'To Be Filled' or the Staff Member we are moving the Shift from, e.g. Abel, and the Staff Member we wish to change it to, e.g. Zoe:
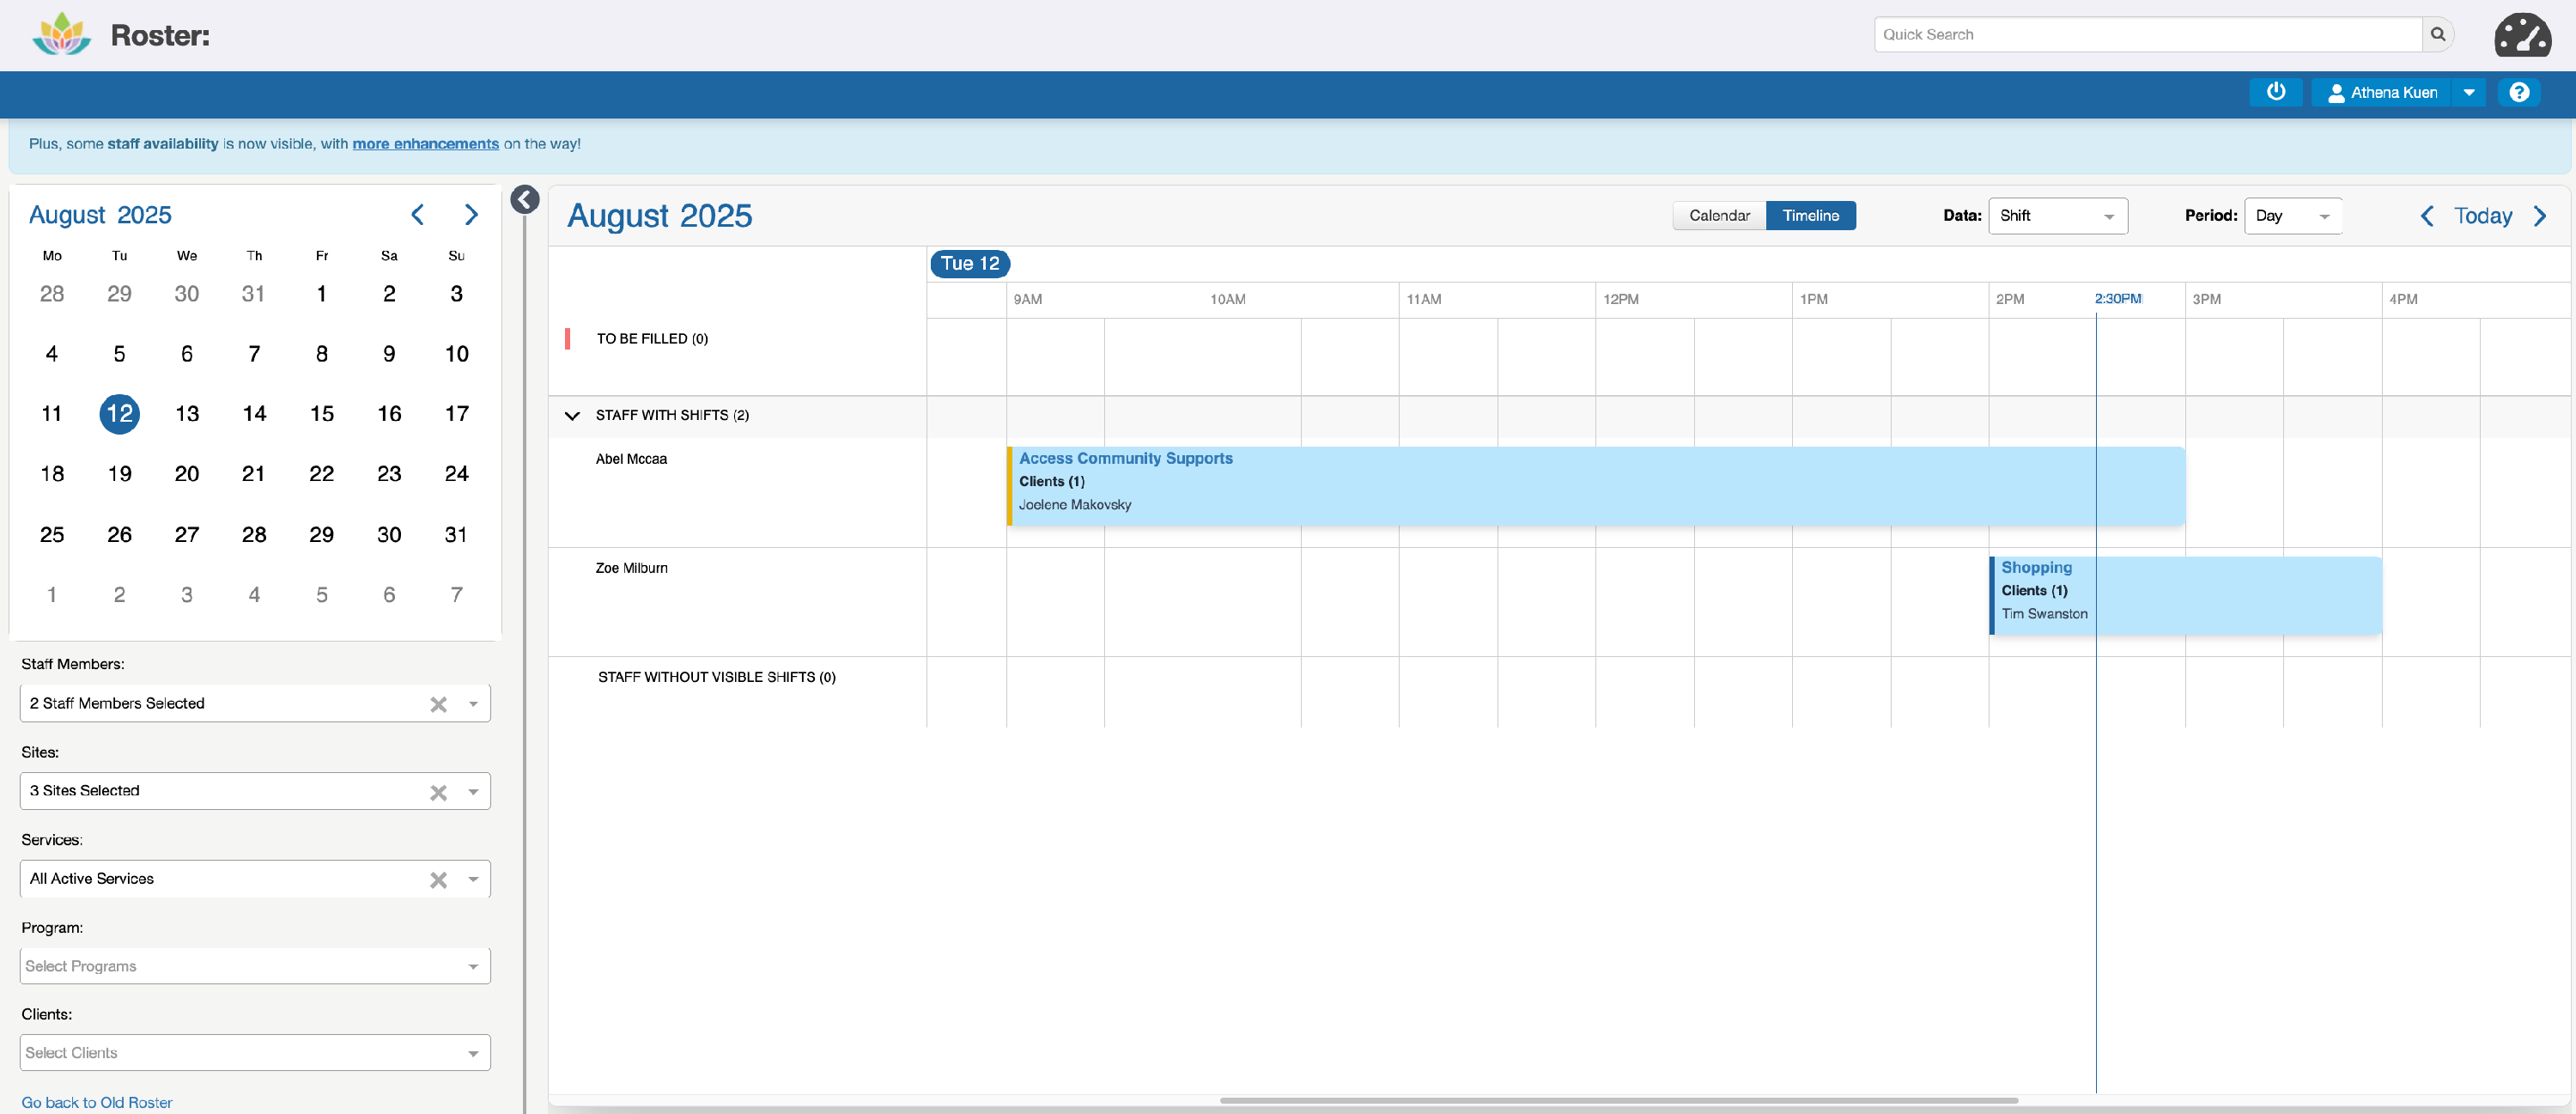
Once we have the relevant options selected, we can move the required Shift accordingly, e.g. Shopping to Zoe as Abel is double-booked:
Then remove or adjust our filters as required.