Configuring Services
This article provides detailed information on configuring newly created Services and editing an existing Service.
This includes information about configuring settings per Service on the 'Service's tab in System Preferences, such as the Service Type, Client Conflict Detection, Support Log Evidence, Programs of Support, Mobile App Check In/Out, and Staff Shift Settings for Sign Off, Capturing kilometres, and setting the default hours and kilometres, either Rostered or Recorded, which are to be used for the Finalised data.
Information is also provided about making Services available at the relevant Sites and configuring General Ledger Codes on the 'Sites' tab, along with configuring the relevant funding for each Service on the 'Funding' tab.
Once Service configuration has been completed, Staff Accounts and Client records can be updated accordingly adding the Site/Service/s where the staff member works and in which the Client participates, as outlined below.
Privileges:
- The 'Edit System Preferences' privilege is required to access the Sites, Services and Funding tabs in System Preferences and complete the related configuration.
- The 'Edit User Accounts' privilege is required to access the 'User Details' tab of Staff Accounts and update the 'Sites and services where this staff member works'.
- Access to the Client record is required to access the 'Client Details' tab and update the 'Client Service Participation'.
Audience: Authorised Representatives or those tasked with Service configuration and updating Site/Service information for Staff and Clients.
Summary
The following list summarises the content of this article. Click on the links below to take you to the relevant sections:
- Configuring Services in System Preferences
- Sites tab
- Services tab
- Service Type Setting (required)
- Activate functionality for ADE or Employment-based Services
- Client Conflict Detection Setting
- Activate the Client Support Log
- Activate Programs of Support for the required Services
- Mobile App - Check In/Out
- Staff Shift Settings
- Additional optional Service Settings
- Change the name of a Service
- Inactivate an existing Service
- Funding tab
- Linking Staff Accounts and Client Records to Sites and Services
Configuring Services in System Preferences
Services are configured on three tabs in System Preferences and staff require the 'Edit System Preferences' privilege in order to access this area of SupportAbilty to complete Service configuration.
System Preferences is accessed via the main menu on the Dashboard:

Service configuration is completed on the following three tabs in System Preferences:
- Sites
- Services
- Funding

Additional learning material
For more information about Services, the following learning material may be of assistance:
- The Services article (linked below) which provides detailed information outlining what a 'Service' is and how it is structured in SupportAbility.
- The Configuring Services video is accessible in the 'System Preferences' section of the Configuration tab in your installation's Learning Centre. It covers some of the information outlined here.
Sites tab
The first step for newly created Services, or when existing Services commence being delivered from another Site is to make the Service available from the relevant Site/s.
This is completed on the 'Sites' tab in System Preferences.
Once this has been configured, the correct Site/Service combination will be available to:
- Add to 'Client Service Participation' in the relevant Client records
- Add to 'Sites and services where this staff member works' and grant Site/Service related privileges in the relevant Staff Accounts
- Select the relevant Site/Service when adding Client Journals and Client Incidents
- Create Activities for this Site/Service
Other Service configurations completed on the Sites tab include:
- Updating 'Only Team Leaders can edit Activities' setting
- Configuring General Ledger (GL) Codes
The following sections outline how to complete these steps.
Make Services available at the relevant Sites
Once a Service has been created, it is essential that the new Service is made available at each of the relevant Sites where it is managed or delivered so that this Site/Service combination can be selected in various records as mentioned above.
To complete this, navigate to the Sites tab in System Preferences.
Select the target icon of the relevant Site, e.g. Melbourne (HQ,) where this Service, e.g. Support Coordination, is delivered/managed. This will open the Site record:

Once the Site record has opened, select the 'Available' checkbox for the relevant Service/s delivered or managed from this Site, then select the 'Save Site' button to save this change:

The Service will now display as 'Available' for that Site on the Sites tab:

Update 'Only Team Leaders can edit Activities' setting
N.B. This configuration is only relevant when organisations have implemented and are using Activities in SupportAbility.
The 'Only Team Leaders Can Edit Activities' setting is configured on the 'Sites' tab in System Preferences and may be configured per Service for each Site.
This setting is activated for all Services by default.
When this is activated, only staff with the 'Team Leader' privilege, either at the Site/Service level or with the global 'Team Leader for ALL Services' privilege can complete the following actions for that Site/Service:
- Create, edit, and delete Activities including adding or removing Clients, updating the Client's Funding Source, marking the Client as 'No Charge', rostering Staff, marking Staff Shifts as 'Includes Break' and 'Not Paid', and updating the 'Finalised' hours and kilometres prior to Activity Sign Off.
- Perform the Activity Sign Off, which finalises all data for Payroll and Billing.
This provides an opportunity to data check all Activity components completed by support staff are correct, prior to performing the Activity Sign Off.
Organisations may choose to inactivate this setting for Services such as Support Coordination, or Therapeutic Services, where Staff delivering this Service usually require a greater level of autonomy to create, edit and manage Activities themselves.
Deselecting the checkbox for this setting will allow any Staff member working in that Service to create, edit and manage Activities:

For more information, please refer to the Privileges required to manage Activities article linked below.
Configure General Ledger (GL) Codes
N.B. This is only relevant when organisations have implemented Finance & NDIS in SupportAbility, and invoices will be generated.
General Ledger (GL) Codes are entered into the 'GL Codes' tab, of your organisation's Site records in System Preferences.
Open the relevant Site then navigate to the GL Codes tab:

When configuring GL codes in SupportAbility, it is important to ensure these are configured for:
- each of the Client Funding GL Code fields for the Sites/Services and Funding Types your organisation will be generating Invoice Batches for
- each of the Staff Timesheet GL Code fields for the Sites/Services your organisation will be generating Timesheet Batches for

Client Funding GL Codes can be set up for any one of the following entities e.g. Site, Service or Funding Type, or any combination of these three.
If your organisation is using SupportAbility to generate Timesheet batches for payroll, then it is recommended that the associated expense code for Staff wages at the Site/Service is entered into the Staff Timesheets GL Code fields for the relevant Site/Services.
For comprehensive instructions regarding this, please refer to the Configuring General Ledger Codes article linked below.
Services tab
Several actions for Service configuration are completed on the Services tab in System Preferences, some of which are required and some applicable only if relevant to your organisation and the Services delivered:
- Service Type Setting (required)
- Activate functionality for ADE & Employment-Based Services (if relevant)
- Client Conflict Detection (if relevant)
- Activate the Client Support Log (if relevant)
- Additional optional Service Settings (if relevant)
-
- Job Code Component
- QDC
- Default HACC MDS Type
- Change the name of a Service (if relevant)
- Inactivate an existing Service (if relevant)
The following sections outline these steps in more detail.
Service Type Setting (required)
The 'Service Type' is set as 'Standard' by default, including for the 'Administration' Service. The 'NDIS Financial Plan Management (FPM)' and 'NDIS Support Coordination' services however both require the specific service-related setting to be applied in order to activate compliance required privacy barriers around Client information for these Services.
The relevant 'Service Type' setting can only be configured by the Customer Success team, and is applied when creating a new Service:

Standard Services
'Standard' Services work on a collaborative model whereby a Staff member who works in one of the Standard Services which a Client participates in can view the Client's information pertaining to all of the Standard Services which that Client participates in.
NDIS Support Coordination
The 'NDIS Support Coordination' setting creates additional privacy barriers for Client Journals recorded for 'NDIS Support Coordination' Services. Once activated, Staff must have access to not only the Client record the Journal has been created for, but also this Service, in order to be able to see these Journals, to ensure the compliance requirements around privacy are maintained.
NDIS Financial Plan Management (FPM)
The 'NDIS Financial Plan Management FPM' setting enables the NDIS 'FPM' tab functionality for Clients who participate in the FPM Service, so that external invoices received can be entered here, for inclusion in a Plan Managed Bulk Payment Request (BPR).

This tab will only be visible to Staff with the 'NDIS Financial Plan Management FPM' Sevice listed in their Staff Account.
Alongside this additional 'NDIS FPM' functionality, this setting creates additional privacy barriers for Client Journals recorded for the 'NDIS FPM' Service. Once activated Staff must have access to not only the Client record, the Journal entry is for, but also this Service, in order to see these Journals, to ensure that compliance around privacy is upheld.
Please see the Steps to set up and use the NDIS Financial Plan Management (FPM) functionality article outlined below for more information.
Activate functionality for ADE & Employment-Based Services (if relevant)
When a Service is an Australian Disability Enterprise (ADE) business e.g. Smith Gardening Services, or an Employment-based Service e.g. School Leaver Employment Support (SLES), Transition to Work/Employment, etc. the following settings should be set on the Services tab in System Preferences:

This will activate additional functionality in Client records which have those Services listed in Client Service Participation.
The ' Employment Based Service' setting activates the following tab:
- Employment - this tab records information relating to future work interests, future work capacity, inductions, educational placements, training, client qualifications, and client work history.


For more information please refer to the Clients: Employment tab video in the Client Management::Specialist Services section of the Learning Centre in your installation.
The ' ADE Service' setting activates both the Employment and the Workforce tabs:
- Workforce - this tab records general information (e.g. work skills, strengths, support requirements, & strategies to assist productivity), workforce information (e.g. tax file #, wages, assessments), supported employee productivity, and observed behaviours.


For more information please refer to the Clients: Workforce tab video in the Client Management::Specialist Services section of the Learning Centre in your installation.
Client Conflict Detection setting
'Client Conflicts' are designed to alert Staff when creating or updating an Activity that a Client is participating in another Activity at the same time.
The Client Conflict Detection functionality may be turned off for some Services if required. This is at the discretion of your organisation, however, a provider may choose to turn it off for Services where the related Activities are structured with a week's duration and are therefore most likely to clash with Client's participating in hourly or daily Activities.
This functionality is activated/deactivated on the Services tab in System Preferences.
The Accommodation or SIL Service, for example, is sometimes managed via week-long Activities. The Client Conflict Detection setting can be turned off for this Service by deselecting the 'Client Conflict Detection' checkbox:

then selecting 'Save Preference Set' to save this update:

Once the Client Conflict Detection setting has been deselected for a Service, in this instance the Accommodation Service, it means that when scheduling Clients for this Service, or other Services e.g. Day Services which share the same date/time with an Activity for the Accommodation Service, a Client Conflict will not display for either Service.
Client Conflicts display in the following manner:
- in the Status column on the Activities tab of a Client record
- 'Client Conflict' amber notification in the Client section of an Activity
- 'Activity Conflicts' notification in the Warnings bar at the top of the 'Edit Activity' screen
- 'Conflicting Activities' icon in the Activity wizard Availability column.
Please review the Client Conflicts article linked below for more information regarding this functionality.
Activate the Client Support Log
N.B. This is only relevant when organisations have implemented Activities in SupportAbility and have elected to use the Client Support Log functionality to record evidence of Service delivery.
The Client Support Log - 'Support Log Evidence Required' setting may be configured where required at a Service level on the Services tab in System Preferences:

For more information relating to this, please refer to the Configuring the Client Support Log featurearticle, linked below.
Activate Programs of Support for the required Services
A feature is available to record the relevant Clients' participation as part of a ‘Program of Support’ in the Activities they are scheduled into, delivered on or after the 1st of July, 2020.
When set, Short Term Cancellations are not triggered for the applicable Support Items. Programs of Support are only relevant for specific Supports and as such, this can be configured as required for each Service in System Preferences.
To do so, navigate to System Preferences and select the Services tab:

The default setting of this feature is 'Never' (as above), given Programs of Support are only applicable for specific Supports and an agreement must be in place beforehand.
However, the following options are available to choose from once 'Change' has been selected:
- Never
- Off by default
- On by default

Each of these options has been outlined further in the Configuring Programs of Support article linked below for reference and we also recommend reviewing the Programs of Support article for a general overview about this feature.
Mobile App - Check In/Out
The ability for Staff to Check In/Out via the Mobile App is configured in the Web App on the 'Services' tab of System Preferences and may be configured differently per Service as required.
The chosen options for this setting are displayed for each service on the Services tab:

The default for this setting is 'Off', however, this may be updated for the Services where staff are required to 'Check In/Out' via their mobile device.
Selecting the 'Change' button will open the 'Mobile App - Check In/Out' window:

This setting has three options: 'Off', 'Record Time', and 'Record Time and Location'.
- Off - When 'Off' is configured and saved, the 'Check In/Out' functionality is turned off and therefore not visible or available in the Mobile App.
- Record Time - When 'Record Time' is configured and saved, Staff will be able to Check In and Out of their shifts associated with this Service using the Mobile App.
The 'Check In' and 'Check Out' buttons will display in the Activity in the Roster view. - Record Time and Location - When 'Record Time and Location' is configured and saved, Staff will be able to Check In/Out of their shifts associated with this Service using the Mobile App, as outlined above.
When checking in/out, they will also be prompted to authorise SupportAbility to access their device's location settings.
By default, the 'Rostered' dates/times automatically populate in the 'Recorded' column of the Activity Staff section in the Web App when the Activity is created. This is designed to facilitate easy signing off the Shift. However, when 'Check In/Out' has been completed in the Mobile App, those dates/times override the existing dates/times in the 'Recorded' column for that staff member in the Web App.
Additionally, when 'Check In/Out' has been completed in the Mobile App the following two items will display in the Web App:
- A blue inline notification will display in the 'Rostered' column to alert staff managing the Acivity as follows; 'Recorded data exists'
- The location symbol will display in the 'Recorded' column, and when selected, the Check In/Out window will open, displaying the 'Check In/Out' dates/times and location if required, relative to the configured settings.
More detailed information on this functionality is provided in the Configuring Mobile App Check In/Out and Record kms by Service article linked below.
Staff Shift Settings
The Staff Shift Settings are configured on the 'Services' tab of System Preferences and may be configured individually per Service.
The configured options apply to both the Web App and the Mobile App, and those selected are displayed in the 'Staff Shift Settings' section on the Services tab:

Selecting the 'Change' button next to each setting will open the related setting's window where the preferred options may be configured.
The How to configure Staff Shift Settings by Service article linked below provides more detailed information on this functionality.
Shift Sign Off
There are three available options for 'Shift Sign Off'; 'Off', 'On - Time Only', and 'On - Time and Location':

- Off - When 'Off' is configured and saved, the 'Shift Sign Off' functionality is turned off and, therefore, not visible or available in the Web or Mobile App.
- On - Time Only - When 'On - Time Only' is configured and saved, the 'Shift Sign Off' functionality is available for all shifts associated with this Service in both the Web and Mobile App.
When the 'Shift Sign Off' is completed, the date and time will be recorded and visible in the Web App in the 'Shift Sign Off' column of the Activity Staff section. Selecting the information icon will open the 'Staff Shift Sign Off Details' window displaying the recorded information.
- On - Time and Location - When 'On - Time and Location' is configured and saved, the 'Shift Sign Off' functionality is available for all shifts associated with this Service in both the Web and Mobile App.
Location, date and time will be recorded when the Shift Sign Off is completed.
For location to be recorded, permission must be granted in phone or browser settings.
Selecting the information icon will open the 'Staff Shift Sign Off Details' window displaying the recorded information.
The default setting for newly created Services is 'On - Time and Location'.
With the introduction of 'Staff Shift Settings' in v8.6, existing Services will have 'Shift Sign Off' set to 'On - Time and Location', in line with the current functionality.
The How to Configure Staff Shift Settings by Service article linked below provides more detailed information about this functionality.
Shift Hours Settings
With the v8.6 update the single ‘Working From-To Time’ column of the Staff section of an Activity in the Web App was split into three columns: ‘Rostered’, ‘Recorded’, and ‘Finalised’. This was to provide greater transparency and audibility between the hours and/or km rostered, the actual hours worked and/or km travelled, and the finalised data for payroll.
The 'Shift Hours Settings' on the Services tab in System Preferences enables your organisation to determine which Shift Hours are used in the 'Finalised' column of the Staff section of the Activity, either Rostered or Recorded.
The default setting for newly created Services is to use Rostered Shift Hours for Finalised. Rostered Shift Hours was also the default for existing Services when this functionality was introduced in v8.6.
Warnings and a Warning Threshold can also be set here when the Recorded Shift Hours deviate, up or down, from the Rostered Shift Hours.
Warnings are off by default, however, your organisation can enable these and set a Warning Threshold as required.
Selecting the corresponding 'Change' button opens the 'Shift Hours Settings' window:

Finalised Shift Hours Default
This setting determines the Shift Hours data which populates in the Finalised column of the Activity and is therefore used for TimeSheets.
The options are:
- As Rostered - When this setting is selected, the Rostered Shift hours entered in the Web App by a staff member with the privilege to manage Activities are used in the Finalised column.
Any 'Active Night Hrs' recorded will be used in Finalised by default, as these are not Rostered. - As Recorded - When this setting is selected, the Recorded Shift hours entered by the rostered Staff Member either in the Activity in the Webb App or via Check In/Out in the Mobile App are used in the Finalised column.
If no Hours are Recorded by the Staff Member, the Rostered data will populate in the Finalised column.
Recorded Hours Warnings Settings
Warnings can be set to alert staff via an inline message when the Recorded Shift Hours differ from the Rostered Shift Hours.
When 'When deviating from Rostered' is selected the 'Recorded Hours Warning threshold' field displays where the number of minutes of deviation may be entered to set the threshold.

The How to Configure Staff Shift Settings by Service article linked below provides more detailed information about this functionality.
Capture Kms
This setting turns 'On' or 'Off' the ability for staff to Roster and Record Private and Company kilometres in the Web App and record Private and Company kilometres with the Shift Sign Off functionality in the Mobile App.
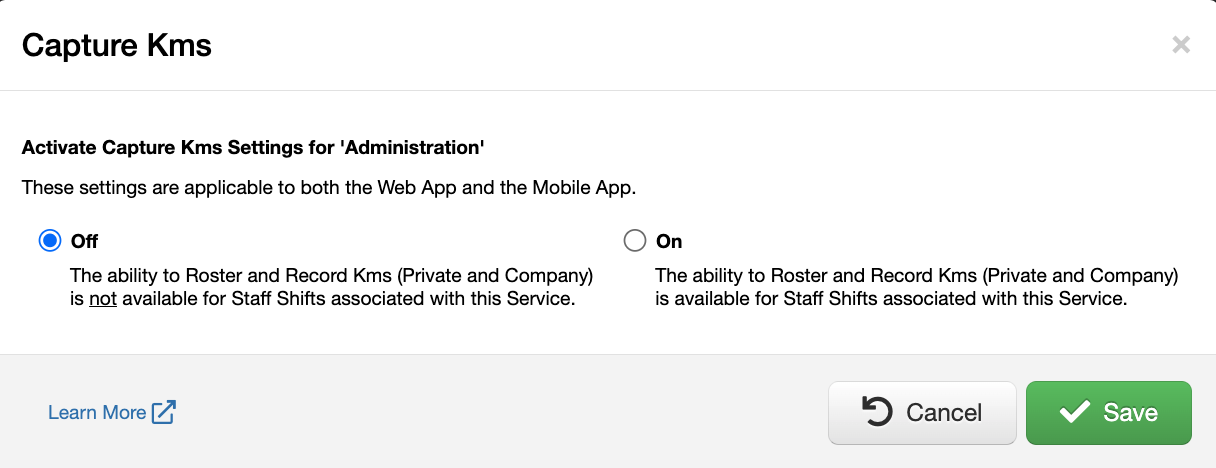
- Off - When configured as 'Off', the ability to Roster and/or Record Private and/or Company Kms is hidden and not available in the Web and Mobile Apps.
- On - When configured as 'On', the ability to Roster and/or Record Private and/or Company Kms is available for Activities created for that Service in the Web App, and to record Private and/or Company Kms when signing off the Shift in the Mobile App.
The default setting for newly created Services is to have 'Capture Kms' set to 'On'. With the introduction of 'Staff Shift Settings' in v8.6, existing Services were configured with 'Capture Kms' set to 'On'.
When changing this setting from 'On' to 'Off', where it was previously set to 'On', a Warning message will display advising the following, and you will be asked to confirm you wish to proceed:
- any existing shifts for this Service where the Activity Sign Off has not been complete or the Shifts have not been included in a Timesheet Batch
- any shifts that currently have Kms and Shift Sign Off if the Shift Sign Off is removed and the shift has not been included in a Timesheet Batch
The How to Configure Staff Shift Settings by Service article linked below provides more detailed information about this functionality.
Shift Kms Settings
The 'Shift Kms Settings' in System Preferences enables your organisation to determine which kilometres are used in the 'Finalised' column of the Staff section of the Activity, either Rostered or Recorded.
This applies to both Private and Company kilometres, as they cannot be configured separately.

Finalised Kms Data Default
This setting determines the Kms data that populates in the Finalised column of the Activity.
The options are:
- As Recorded -When this setting is selected, the Recorded Kms entered by the rostered Staff Member either in the Activity section of the Webb App or in the Mobile App are used in the Finalised column.
If no Kms are Recorded by the Staff Member, the Rostered Kms data will populate and be used in the Finalised column. - As Rostered - When this setting is selected, the Rostered Kms entered in the Web App by a staff member with the privileges to manage Activities are used in the Finalised column.
The default setting for newly created Services is to use Recorded Kms in the Finalised column of the Staff section of the Activity. With the introduction of 'Staff Shift Settings' in v8.6, existing Services were configured to use Recorded Kms in Finalised.
Recorded Kms Warnings Settings
Warnings can also be set to alert staff via an inline message when the Recorded Kms differ from the Rostered Kms, based on a configured threshold.
When 'When higher than Rostered' or 'When deviating from Rostered' is selected the 'Recorded Kms Warning threshold' field displays. The relevant number of kilometres of deviation may then be entered e.g. 10.00 km:

The following explains each setting:
- No Warning - When this setting is selected, no Warnings will display relating to deviations between the Rostered and Recorded Kms.
- When higher than Rostered - When this setting is selected, an inline Warning message will display when the Recorded Kms value is higher than the Rostered Kms value, based on the number of kilometres set for the threshold.
- When deviating from Rostered - When this setting is selected, an inline Warning message will display when the Recorded Kms deviate from the Rostered Kms, up or down, based on the number of kilometres set for the threshold.
This is displayed below the Recorded Kms column in the Web App; e.g. Exceeds warning threshold of 10kms.
Warnings are off by default, however, your organisation can enable these and set a Warning Threshold as required.
The How to Configure Staff Shift Settings by Service article linked below provides more detailed information about this functionality.
Additional optional Service Settings
If your organisation is using Job Codes, the relevant Job Code Components will need to be configured in System Preferences on the Services tab, once our Customer Success team has enabled your required Job Coding Structure within your SupportAbility installation.
This will only appear when enabled by SupportAbility in your installation.
For more information relating to this, please refer to the Job Codes article, linked below.
QDC
Choose the Quarterly Data Collection (QDC) code that relates to this Service if you wish to run QDC reports by Service Type rather than Funding Type.
Please note this requires further configuration in System Preferences Settings.
For more information relating to this, please refer to the QDC Reporting section in the Activities Configuration article, linked below.
Default HACC MDS Type
Choose the Victorian HACC Minimum Data Set (MDS) categorisation that relates to this Service if you need to report Victorian HACC MDS data to DHHS.
Once selected this activates the default to be used in Activities delivered for this Service.
Change the name of a Service
If your organisation wishes to change the name of a Service, this can be completed on the Services tab in System Preferences:

N.B. The change of name will be applied throughout the entire system, and thus reflected in all records linked to that Service, including historical records.
Inactivate an existing Service
We do not recommend deleting any records in SupportAbility, in order to preserve important information for historical purposes.
Therefore if a Service is no longer required, Staff with the ‘Edit System Preference’ privilege have the ability to make the Service inactive by deselecting the 'Active' checkbox on the Services tab in System Preferences:

N.B. if a Service is made inactive (by deselecting this checkbox), it can no longer be:
- added to Staff Accounts,
- added to Client Service Participation in Client records,
- selected when creating an Activity
- linked to a Journal, etc.
An additional feature is available that SupportAbility can action for your organisation, whereby Services can be merged. For example, if two Services are being consolidated into one, this may be beneficial. Please see the Merge Feature for Sites and Services article linked below for more information.
Funding tab
Update the Funding Types usable by this Service (required)
N.B. This is only relevant when organisations have implemented using the Finance & NDIS workflow in SupportAbility.
When a new Service has been created, the Funding Types which can be used to pay for this Service, most importantly NDIS, should be updated in the Funding tab in System Preferences:

For more information relating to this, please refer to the Activate the Services that can be paid for using NDIS Funding section of the Finance & NDIS | Preparation article, linked below.
Linking Staff Accounts and Client Records to Sites and Services
Once a new Service has been added and configured appropriately, it is important that this Service is added to the relevant records to both provide Staff access to Client information and enforce the necessary Privacy barriers:
- Staff Accounts - 'Sites and services where this staff member works'
- Client records - 'Client Service Participation'
The following sections outline these steps in more detail.
Update 'Sites and services where this staff member works' (required)
Prerequisite: Staff completing this configuration will need to have the 'Edit User Account' privilege in order to access the relevant Staff Accounts.
When a new Service has been added to your installation (e.g. Day Services), it is important that this Service is added to the 'Sites and services where this staff member works' section of all relevant Staff Accounts:

Once this section has been updated to include the new Service these Staff will be:
- able to view Client records which have this Service listed in Client Service Participation
- available for selection when creating Activities for this Service
For more information relating to this, please refer to the Sites and services where this staff member works section of the Foundations | Staff Accounts article, linked below.
Client records - Update 'Client Service Participation' (required)
Prerequisite: Staff completing this configuration will need to have access to the relevant Client records.
When a new Service has been added to your installation (e.g. Day Services), it is important that this Service is added to the 'Client Service Participation' section of all relevant Client records:

Once the Client Service Participation section has been updated to include this Service:
- this Service will be available for selection when creating a Journal for those Clients
- those Client records will be accessible to Staff who have this Service listed in their Staff Account
- those Clients will be available for selection when creating Activities for this Service
For more information relating to this, please refer to the Client Service Participation article, linked below.